Contact Form 7 is one of the plugins used by WordPress blog owners so as to have a contact form on their blog as that their blog owners can easily send email to that blog owner.
Not only that, it can also be used as a form of accepting guest posts, but of course this depends on how you customize it for your blog.
One of my blog readers visited my “Contact Me” page and noticed the check box on my contact form. If that check box is not ticked then it is impossible for an email to be sent to me. So he wanted to find out how I added this check box to my Contact Form 7 WordPress plugin.
This is just a small tutorial post to help out my blog reader and hope that it will benefit others as well.
[box]Preview Of My Contact Page[/box]
[box type=”spacer”]How To Add Check Box On Contact Form 7[/box]
First thing you want to do is install the plugin on your WordPress blog if you haven’t done so as yet.
After you install the plugin, go to the setting page for the Contact Form 7 plugin. Select to edit the contact form for your contact page.
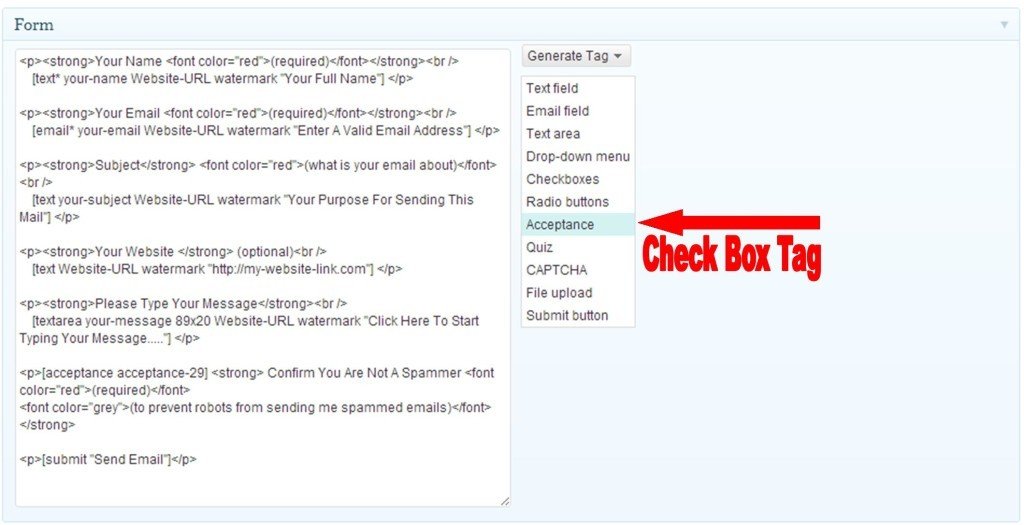
If you notice on the right hand section when editing the contact form you will see a drop down menu labeled “Generate Tag”. You can use it to generate text fields, buttons and other stuff for your contact form.
You will see an option on the drop down list called Acceptance. This tag is used to create the check box to help prevent spammers.
Look at the image below.
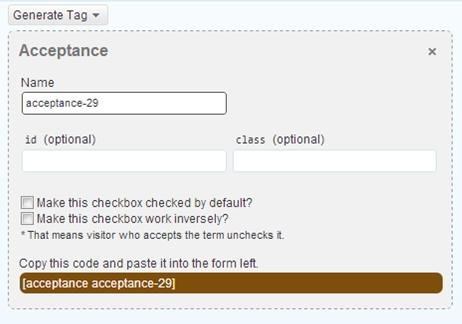
After clicking the Acceptance option from the drop down list, it will generate the code for you to insert on the form. The code that should be copied will be hi-lighted in brown.
Copy the code and what you want to do is to paste that code right before the “Send Email” button. This way your blog visitors who want to contact you will see the check box and will be required to tick that box if they want to send the email to you. It is also important to add a label beside it asking your blog visitor to check to box to confirm that they are human or not a spammer.
Fill out the other settings with your email and that should do it.
Your contact form will now look something like this below.
[box type=”yellow”]My Contact Form 7 Coding[/box]
If you want your contact form 7 to look exactly like mine, then you can copy the code below and paste it inside your contact form.
<p><strong>Your Name <font color="red">(required)</font></strong><br/>
 [text* your-name Website-URL watermark "Your Full Name"] </p>
<p><strong>Your Email <font color="red">(required)</font></strong><br/>
 [email* your-email Website-URL watermark "Enter A Valid Email Address"] </p>
<p><strong>Subject</strong> <font color="red">(what is your email about)</font><br/>
 [text your-subject Website-URL watermark "Your Purpose For Sending This Mail"] </p>
<p><strong>Your Website </strong> (optional)<br/>
 [text Website-URL watermark "http://my-website-link.com"] </p>
<p><strong>Please Type Your Message</strong><br/>
 [textarea your-message 89x20 Website-URL watermark "Click Here To Start Typing Your Message....."] </p>
<p>[acceptance acceptance-29] <strong> Confirm You Are Not A Spammer <font color="red">(required)</font>
<font color="grey">(to prevent robots from sending me spammed emails)</font></strong>
<p>[submit "Send Email"]</p>
Have fun and all the best in blogging!
Please let me know if it works and feel free to contact me if you need anymore tutorials.


Prakash
Dicks
Kharim Tomlinson
Mihai Alexandru
Kharim
Matt
Kharim
Naser
Kharim
Ferb
Kharim
Tim
Kharim
abdelrhman
Kharim
Aayna
Kharim
John Mak
Kharim
Fatima
Kharim
Purnima
Kharim
Ali usman
Kharim
Bradley Johnson
Kharim
sarika deshmukh
Kharim
jawad zaib
Kharim
Jamy
Kharim
Suresh Khanal
Kharim